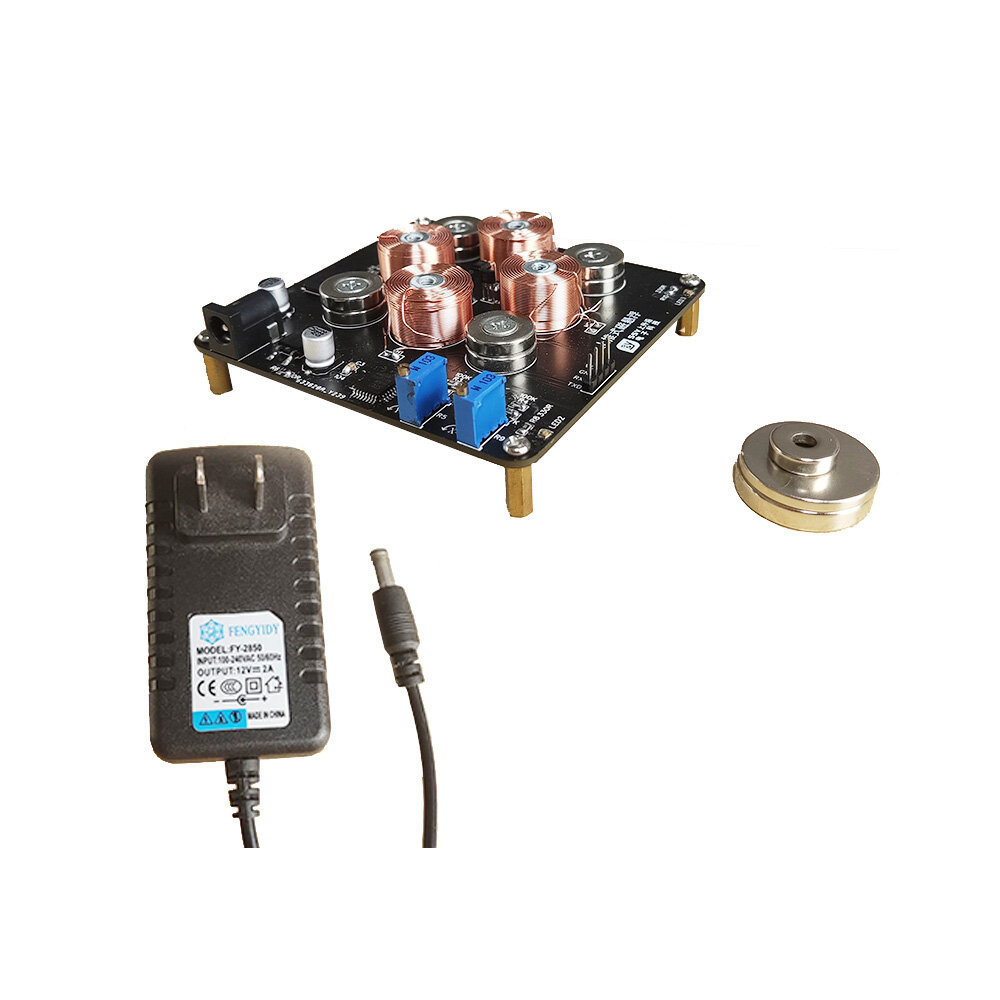
Push-down Magnetic Levitation Electronic DIY Spare Parts Soldering Training DIY Kit
21,61 €
- Description
- Additional information
- Reviews (10)
- Vendor Details
- Product Inquiry
Description
Feature: There are 4 options, please confirm the option you need before placing an order. To avoid unnecessary misunderstandings.
Note that there will be orange color in the selection box after selecting, and gray color for not selected.
Kit parameters:
Power supply power supply: DC12V 2A
Floating can be called lighter objects (less than 50g)
Main control board: The suspension system is controlled by a single -chip microcomputer to save complex peripheral circuits. The welding is simple. Only a small amount of components are used to control more stable and reliable.
Note: Working for a long time, the 1293 chip will have fever.
Finished product size: 90*90*25mm
Weight: about 180g
Features:
This product mainly includes single-chip microcomputers, strong magnets, coils, Hall sensors, signal amplifier circuits, H bridge drive circuits, and DC-DC antihypertensive circuits. The closed-loop control method is used to make the static characteristics of the static static characteristics of the setting.
The single -chip microcomputer continues to detect the position of the suspended body by sampled the two Hall sensors, and the magnetic field force of the coil is controlled by driving the H bridge circuit to control the coil, so that the suspended body will not deviate from the center position, and it can achieve a long -term stable suspension function.
Package includes:
| Name | Label | QTY. |
| Patch STC8H1K28 single chip machine | U7 | 1 |
| Patch L293DD chip | U5 | 1 |
| Patch 78MO5 Stabilization Chip | U6 | 1 |
| Patch LM358 chip | U4 | 1 |
| 3296W potentiometer 103 | R5 R9 | 2 |
| Patch electrolytic capacitance 16V 220UF | C1 C2 | 2 |
| Linear Hall sensor AH3503 | U1 U2 U3 | 3 |
| 0805 Patch capacitance 104 | C3 | 1 |
| 0805 Patch resistance 100K | R3 R4 | 2 |
| 0805 Patch resistance 4. 7K | R1 R2 | 2 |
| 0805 Patch resistance 0R | R6 | 1 |
| 0805 Patch resistance 330R | R7 R8 R10 R11 | 4 |
| DC2.1 power seat | J1 | 1 |
| Patch 0807 Seven Color Lights | L1 L2 L3 L4 | 4 |
| Magnetic suspension coil | 4 | |
| Iron boron magnet hole 4mm, diameter 15mm thick 4mm | 8 | |
| Iron boron magnet hole 4mm, diameter 12mm thick 4mm | 1 | |
| Iron Boron Magnet solid diameter 25mm thick 5mm | 1 | |
| Iron Boron Magnet solid diameter 25mm thick 3mm | 1 | |
| M4 nut | 4 | |
| M4x12 screw | 4 | |
| M3X6 screw | 8 | |
| M3x12 copper column | 4 | |
| PCB board | 1 | |
| DC12V 2A power supply | 1 |
Instructor:
1. Put the flying saucer base (the base of the suspension system) on the horizontal desktop. (If the desktop is not well displayed, it will not be suspended).
2. Connect the power of the magnetic suspension base (DC12V 2A). After the normal connection is connected, the power indicator is not on.
3. Keep the hand in the hand, hold the suspended support, and at the upper side of the base of the base, about 10cm, so that the display of the display of the display is slowly close to the center of the system. This position is the suspension position of the displayed trim (about 12mm -15mm above the base). After grasping the sense of balance of the shot, let go of your hands slowly, and the display support can be suspended and rotated in the air.
4. Please ensure that the system is far from lyric products (at least 20m), such as computers, audio, and other products with medium waves and magnetic forces. Otherwise, the display will not be able to suspend the power supply normally, such as the interruption, and the display will not be suspended normally. If it is not used for a long time, the suspension support is separated from the base.
5. If you install your own magnet, you must pay attention to distinguish the magnet NS direction. When the suspended support and the base magnet are sucked, the indicator light is on when the suspension tray is placed. Explain that the magnet is installed correctly, otherwise it is reversed.
Points to Note:
1. Avoid the display on the hard ground or collide with other objects, otherwise it will damage the suspension system.
2. Please make sure that the suspended support is placed in the correct position of the suspension system.
3. Avoid violent vibration or tapping the base, otherwise the suspension system installation in the base will be easily damaged.
4. This product is magnetic. Please keep the distance from the watch and the mobile hard disk easily maintain the distance of more than 20cm.
5. Do not repeat the suspension support over the base in a short period of time, otherwise the difficulty of the shadow shadow and the suspension support will cause the heat of the suspension system to rise rapidly.
6. If it is difficult to display the trustees during use, please break the base and restart the machine after 5 minutes.


Additional information
| Weight | 0,18 kg |
|---|
10 reviews for Push-down Magnetic Levitation Electronic DIY Spare Parts Soldering Training DIY Kit
Only logged in customers who have purchased this product may leave a review.
Vendor Information
Vendor: Electronics Stock DiscounRating: 3.48 rating from 2072 reviews
Company: Stock&Discount



Columbus –
Please think carefully when purchasing this item.
Deangelo –
Is this seriously how you treat your customers?
Reggie –
This disappointed me so much.
Reed –
Got some issues, but it works for me.
Michael –
Sadly, the item was broken, but they offer me a refund so I’ll give a 3-star rating for the support
Betty –
Thank you guys for this amazing creation! Absolutely mind-blowing!
Elian –
Think this could be a potential item in the future
Wellington –
Buying this was my worst decision
Kieran –
I wish there were more customization possible. The support is okay.
Gerardo –
I feel like these social media feeds are expensive for what they offer.